Authors: Aisling McGowan and Irene Steenbruggen
Aims
- To understand the rationale for quality assurance including ability to correctly describe, document, and ensure quality standards and practice
- To understand strategies for the prevention of infection transmission
Overview
1. Provide strategies for quality assurance
- Requirements for equipment quality control
- Calibration and verification
- Importance of recognising device measurement errors during calibration and quality checks
2. Provide strategies for hygiene and infection protection and control
- Precautions to protect staff and patients
- Rationale for regular cleaning
- Describe methods for prevention of infection transmission
- Performance and record of infection control procedures
Quality Assurance
- Quality Control (QC) is the process of measuring and monitoring the quality of the data.
- Quality Assurance (QA) is a group of routines and interventions to ensure the data is high quality.
- Good QA systems use a robust series of checks before during and after the patients' visit to ensure the results will be accurate and as precise as possible.
- QA and QC are valuable tools to ensure that those performing the test can resolve arising issues, providing accurate and meaningful results (best representation of the patient's clinical status).
- A QA/QC programme can help identify and minimise sources of error.
| Pre procedure notes | Familiarise yourself with the equipment and manufacturer instructions on calibration or calibration verification. Spirometer equipment ideally is ISO 26782 compliant and calibration syringe has an in-date certificate. The syringe is always checked for leaks (daily inspection and monthly leak check must be documented). Checks all parts are in good working order before this procedure. Note that room temperature and syringe temperature may negatively affect results. Refer to latest national and international standards. If using software consult the manufacturer instructions for use. Refer to latest national and international standards. |
| Calibration types | A calibration verification is the procedure used to validate that the device is within calibration limits (i.e., =/-3% [accuracy tolerance, =/-2.5% for spirometers plus =/-0.5% for calibration syringes]). In calibration mode the equipment will exclude the BTPS factor to the results. |
| Note on pre-calibrated sensors | Precalibrated sensors must undergo calibration verification. Manufacturers must specify the action to be taken if a pre-calibrated device fails the calibration verification. |
| Setup procedure | Always use a filter during the calibration of flow sensing equipment. Connect the calibrator (3 L Syringe) securely to the spirometer sensor without causing allowing air to flow through the device. If variable flow is detected during the zero-flow setting procedure or if the zero level has changed significantly, the zero-flow setting procedure must be repeated. |
| Perform procedure | Fill the syringe completely with air and attach the calibration syringe firmly to the equipment sensor (always use a filter during the calibration of flow sensing equipment). |
| Empty the syringe smoothly and completely until a soft click is heard. Repeat this cycle while observing the syringe strokes on the equipment screen. Do not bang the syringe when emptying it, to avoid any damage or errors. Tip: follow the screen or software instructions to aid performance of this procedure. Linearity of the system is assessed as follows: The calibration manoeuver is typically performed three times at different flow rates. The recorded volume should be repeatable: when using a 3L syringe the largest - smallest measured volume should not deviate by more than 90 mL. Repeat above 3 to 5 times, you will be instructed to alter the speed of the air injections (slow, medium and fast) and must comply with the "multi flow" calibration standard (a range varying between 0.5 and 12 L/s with 3-L injection times between 0.5 and 6 s). The resulting simulated FVC values must fall within the +/- 3% range. Each time stamped successful calibration must be stored either within the software or as a print-out. | |
| Calibration result | The measured volume displacement should be within 2.91 L and 3.09 L at ATPS conditions. Results must be printed or stored for recall later. |
| Quality Assurance Documentation | Device Quality Assurance Attention to equipment quality assurance and calibration is an important part of good laboratory practice. The minimum requirements are as follows: Maintenance of a log of calibration results Documentation of repairs or other alterations that return the equipment to acceptable operation Recording of dates of computer software and hardware updates or changes Recording the dates equipment is changed or relocated (e.g., industrial surveys) Calibration verifications and quality control procedures must be repeated after any such changes before further testing begins |
Table 1. Daily calibration procedure
Video 1. Spirometer calibration
Hygiene, Infection Protection and Control
- The goal of infection control is to prevent the transmission of infection to patients and staff during pulmonary function testing.
- Infection can be transmitted by direct contact with surfaces such as mouthpieces, noseclips, handheld spirometers, chair arms, and immediate proximal surfaces of valves or tubing.
- Indirect transmission occurs by aerosol droplets generated by the patient blowing into the equipment but also expelled into the air of the testing room between manoeuvres.
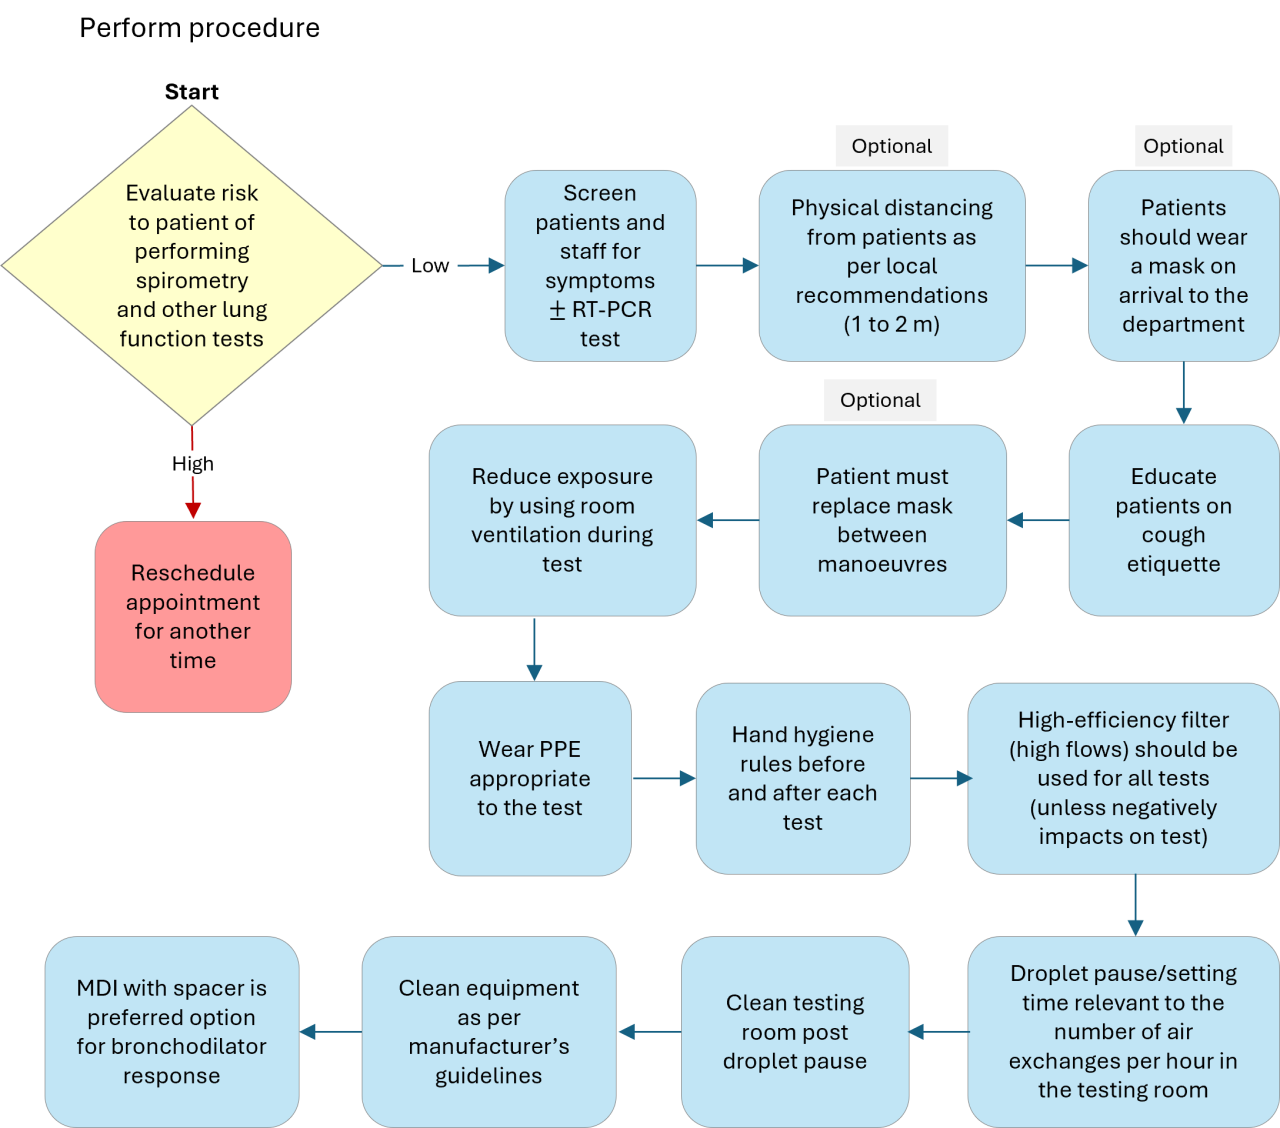
Table 2. Spirometry test hygiene, infection protection and control steps (should comply with local policy)
Video 2. Hand washing
Video 3. Special considerations
Special considerations include spirometry in the supine position, a child-friendly paediatric waiting room, the use of PPE with immunocompromised patients and proper disposal and disinfection (see Video 3 demonstration).
Standardization of Spirometry 2019 Update An Official American Thoracic Society and European Respiratory Society Technical Statement. Brian L. Graham et al. Am J Respir Crit Care Med 2019. 200:e70-e88
International consensus on lung function testing during the COVID-19 pandemic and beyond. Aisling McGowan et al. ERJ Open Research 2022 8(1): 00602-2021; DOI: 10.1183/23120541.00602-2021
Pulmonary function testing during SARS-CoV-2: An ANZSRS/TSANZ position statement. Borg BM et al. Respirology 2022. 27: 688-719. DOI: 10.1111/resp.14340

